
Have you ever opened a bracelet making kit, looked at the compartments of beads, and felt completely stuck? Or maybe you strung a few together, but the finished piece just looked like a random pile of plastic instead of something you’d actually wear.
This color anxiety is real. It stops you from enjoying the process and wastes your materials.
During my 7 years teaching K-5 art in Austin, I noticed that beginners don’t lack creativity; they just lack a simple, systematic way to think about color. Combine that with a cheap kit where all the beads are mixed together in one bag, and frustration is guaranteed.
Today, we are going to fix that. I will share the exact color matching rules I use, explain how to avoid clashing, and show you how to easily create sophisticated pieces using an organized bracelet making kit.
1. Why Color Matching is the Core of Bracelet Aesthetics
A bracelet isn’t just string and beads. It is a deliberate choice you make about what you want to wear.
1.1 The Common Problem for Beginners
- Material piling: Many DIYers buy materials based on sheer quantity, ignoring how the colors actually relate to each other. The result is a messy, disorganized look.
- Lack of systematic guidance: You can find hundreds of fragmented tutorials online, but very few explain the “why” behind the design. This leaves beginners completely lost when figuring out how to choose colors for beaded bracelets.
When I first started arranging beads, my combinations weren’t harmonious either. Without a plan, the colors blend together into a chaotic blur.
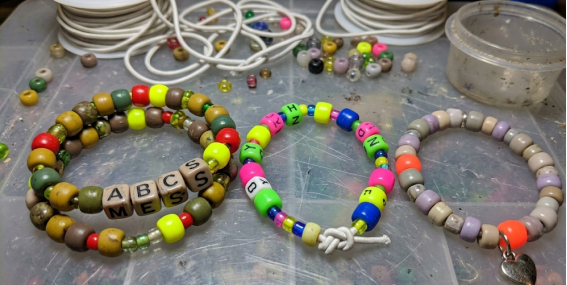
1.2 Color Psychology and Trends Color has silent power. A successful design pairs basic color psychology with what you actually want to wear.
- Blue tones: Bring a sense of calm, composure, and trust.
- Yellow tones: Full of energy, sunshine, and optimism.
- Pink tones: Symbolize gentleness and healing.
- Dopamine colors: Highly saturated, vibrant colors that instantly visually energize a piece.
- Trend insights: In popular culture, Taylor Swift’s Eras Tour drove a massive global trend in friendship bracelets, with fans using specific color palettes to represent different albums, emotions, and inside jokes.
2. Master the Magic of Color: Professional Rules
Color matching isn’t some mystical art. It is just basic theory applied to your bead tray. Master these, and you won’t have to guess.
2.1 Basic Color Theory The color wheel is your best tool.
- Complementary colors: Colors opposite each other (like red and green, or blue and orange). They create strong contrast and high visual impact.
- Analogous colors: Colors next to each other (like blue and green). They create a soft, harmonious transition, ideal for an understated look.
- Triadic color scheme: Three colors evenly spaced on the wheel. It creates a balanced but vibrant effect.
Understanding Bead Styles:
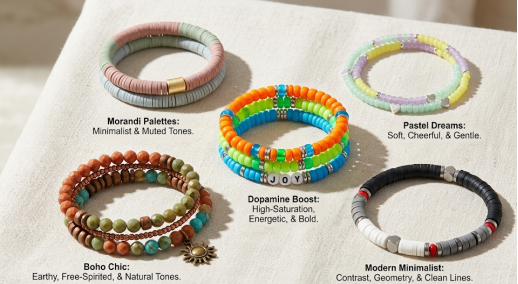
- Morandi colors: Low-saturation gray tones (gray-pink, gray-blue). They create a tranquil atmosphere for a minimalist aesthetic.
- Macaron colors: Fresh, low-saturation pastels (mint green, lavender). Highly popular for families crafting together.
- Dopamine colors: Bright, highly saturated combinations (bright orange, electric blue). Perfect for young creators pursuing bold trends.
- Bohemian style: Blends earth tones (brown, beige) with vibrant ethnic colors (red, turquoise) for a free-spirited look.
2.2 Bead Textures and Materials Different materials reflect light differently, which changes how their colors interact.
- Glass beads: Crystal clear with strong luster. Pair them with adjacent colors for a polished, high-end look.
- Polymer clay (Heishi) beads: Matte texture and rich colors. They stack flat against each other to create solid blocks of color.
- Metal accessories: Gold or silver spacer beads act as a visual break. A 5-to-1 ratio (five clay beads to one gold spacer) instantly elevates the design.
2.3 Avoiding Common Misconceptions Overly complex color combinations usually look messy. Keep it simple:
- Determine a main color: Pick one or two base colors, then coordinate around them.
- Use neutral buffers: White, cream, black, and gray balance out bright colors and add sophistication.
- Add an accent: Use one highly contrasting bead as a focal point.
- Pull from life: Use the ocean or a sunset as a reference. You can easily build summer beaded bracelet color ideas using a professional kit packed with ocean blues and sandy neutrals.
3. Seasonal and Occasion-Based Schemes
3.1 Spring/Summer Vitality
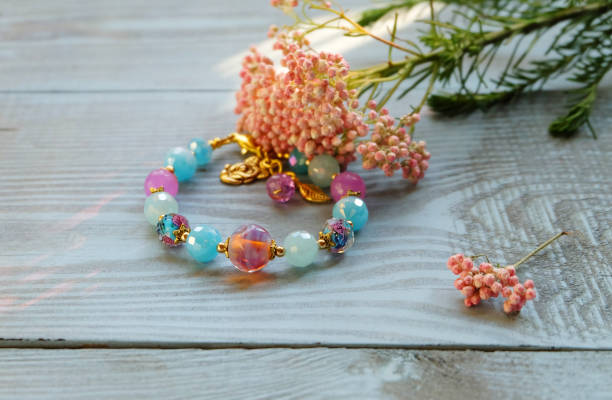
- Floral themes: Pink, light green, and off-white.
- Summer Colors of Friendship Bracelets: Bright contrasting combinations like orange and blue exude youth and energy.
3.2 Autumn and Winter Warmth
- Autumn Whispers: Brown, khaki, and dark green paired with amber beads.
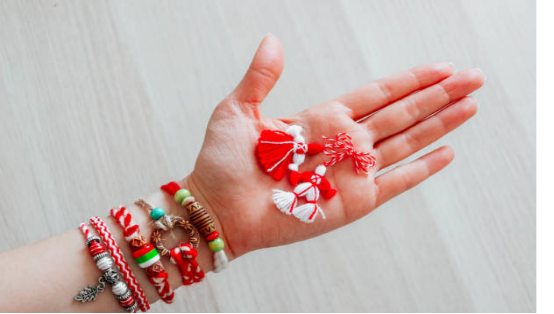
- Christmas Limited Edition: Classic red, green, and gold, or frosty white and ice blue. A well-planned Christmas beaded bracelet feels festive without being overwhelming.
- Elegant design: Deep purple, black, and silver create elegant color combinations for bead bracelets suitable for evening wear or formal occasions.
3.3 Personalized Occasions
- Valentine’s Day & Mother’s Day: Soft off-white, light pink, and letter beads spelling a name or a private joke.
- Joyful Colors for Kids: Bright rainbows and cartoon patterns are great Kids Beaded Bracelet Color Ideas. (Note: Always supervise children when cutting cords).
4. The Secret to a Functional Bracelet Making Kit
A kit is only as good as the materials inside it. If you are frustrated by your crafts, it might be your supplies, not your skills.
4.1 Components of a Reliable Kit
- Material quality: PBT or glass beads offer a substantial weight that ordinary plastic lacks.
- The Cord: This is where most kits fail. The thickness of the elastic cord determines durability. We strictly use a 0.8mm clear elastic cord that withstands 5,000+ stretch cycles, rather than the fragile 0.4mm strings.
- The Letters: A good kit weights the vowels. We ensure you have extra A, E, I, O, and U beads so you don’t run out when spelling real names.
- Tools and Storage: A 48-grid storage box keeps colors strictly separated. Scissors and tweezers mean you don’t have to hunt around your house to start crafting.
4.2 Choosing the Right Fit
- Parent-child kits: Require ASTM F963 certification for safety (non-toxic, lead-free).
- DIY enthusiast kits: Offer advanced guides and unique color schemes for handmade bracelets.
- Trend-focused kits: Provide materials to match trending bracelet color palettes 2026 and designer-inspired bead bracelet color ideas.
5. Develop Your Unique Style
5.1 Sketching and Arranging Before tying a single knot, arrange your beads on a flat surface or a bead board. This lets you test easy color combinations for friendship bracelets. When letter beads are strung together to spell words like HOPE, BEST, or an inside joke, the arrangement tells its own story. Color inspiration can come from natural elements, seasonal colors, or clothing combinations.
5.2 Tying It Together Ensure your bracelet length fits the wrist (typically 17–20cm for adults, 12–15cm for kids). Learn to tie a secure surgeon’s knot so your elastic holds permanently.
6. Frequently Asked Questions (FAQ)
What age group is the Bracelet Making Kit suitable for?
DIY bracelet making is a great activity for parents and children, but children should be supervised by adults when cutting the thread . Generally, children over 6 years old can complete most of the steps independently under adult supervision, while younger children can participate in selecting and arranging the beads. The key is to choose age-appropriate, non-toxic, large beads.
How can I ensure the durability of my bracelet?
The thickness of the elastic cord determines the bracelet’s stretch and durability; 0.8–1mm elastic cord is recommended for children’s bracelets . Additionally, metal fittings such as clasps should be treated to prevent oxidation and discoloration after wearing . Proper knotting (such as double slip knots or reinforcing knots) and regular checks of the cord and beads for wear will also extend the bracelet’s lifespan.
Can I use the materials in the kit to make other jewelry?
Absolutely! Many beads and accessories in bracelet making kits are versatile. You can get creative and use them to make necklaces, earrings, keychains, or even decorative phone cases. That’s the fun of DIY.
How to avoid color clashes when choosing colors?
Color blocking is sometimes an intentional design choice, but if you want to avoid clashing colors, you can try the following methods:
1.Limit the number of colors : Beginners should limit themselves to 3-5 colors.
2.Use different shades of the same color family : for example, choose different shades of blue and green.
3.Add neutral or colorless transparent beads : they can act as a good buffer.
4.Refer to existing successful color schemes : such as those in fashion magazines, interior design, or even natural landscapes.
What’s the difference between polymer clay beads and glass beads?
Polymer clay beads require baking to set, while glass beads do not require baking but need to be protected from impact . Polymer clay beads are lightweight, come in a variety of colors, and usually have a matte or frosted texture, suitable for a lively and cute style. Glass beads, on the other hand, are crystal clear with a strong luster, appearing more delicate and suitable for creating an elegant or luxurious look. The two also differ in durability and manufacturing process.
Let color bloom at your fingertips
As different beads are slowly strung together at your fingertips, each color and material subtly tells a story that reflects your style and personality. By learning the art of color matching, you’ll discover that even simple materials can be transformed into works full of design and warmth.
If you’d like to make creating easier and more inspiring, a well-designed Bracelet Making Kit is a great place to start. Choose the right materials, let your inspiration gradually come together, and perhaps the next stunning bracelet will be born on your fingertips.
